BGP conditional advertisements

Goal

Check for presence of route 10.100.1.1/32 via peer with AS 4049.
If present, apply route map 60_30_ACCEPT_10_100. This will limit advertisements to peer 172.31.1.1 to strictly 10.100.0.0/8.

Prefix lists

config router prefix-list
  edit "match_10.100.1.1_32"
        config rule
            edit 1
                set prefix 10.100.1.1 255.255.255.255
                unset ge
                unset le
            next

 edit "accept_10.100/16"
        config rule
            edit 1
                set prefix 10.100.0.0 255.255.0.0
                set ge 24 // Also accept prefixes with a bitmask greater than 24, i.e /32
                unset le
            next
        end

AS-path list

config router aspath-list
    edit "match-as-4049"
        config rule
            edit 1
                set action permit
                set regexp "_4049_"
            next
        end
    next
end

Route maps

config router route-map
   edit "match-from-AS-4049"
        config rule
            edit 1
                set match-as-path "match-as-4049"
                set match-ip-address "match_10.100.1.1_32"
            next
        end
    next

   edit "60_30_ACCEPT_10_100"
        config rule
            edit 1
                set match-ip-address "accept_10.100/16"
            next
            edit 2
                set action deny
            next
        end
    next

BGP configuration

config router bgp
   config neighbour
      edit "172.31.1.1"
            set remote-as 64333
            config conditional-advertise
                edit "60_30_ACCEPT_10_100" // route map to apply
                    set condition-routemap "match-from-AS-4049"
                next
            end
        next

Neighbour output – no match

BGP neighbor is 172.31.1.1, remote AS 64333, local AS 65531, external link

  13 accepted prefixes
  21 announced prefixes
  Conditional advertise-map:
    Adv-map 60_30_ACCEPT_10_100root, cond-map match-from-AS-4049root, cond-state 1-0

Neighbour output – match

BGP neighbor is 172.31.1.1, remote AS 64333, local AS 65531, external link

  13 accepted prefixes
  5455 announced prefixes

  Conditional advertise-map:
    Adv-map 60_30_ACCEPT_10_100root, cond-map match-from-AS-4049root, cond-state 1-1
1-0 means condition was not met; 1-1 means it was.

To soft-clear outbound routes

exe router clear bgp ip 1.1.1.1 soft out
Enabling crypto-mining protection on a FortiGate firewall

There are multiple tools on the FortiGate that should be enabled. A quick list is below.

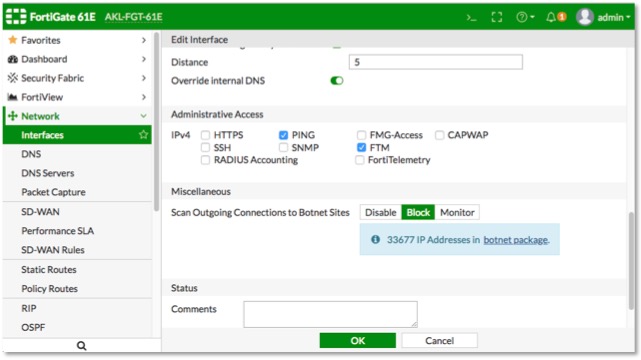
Enable the Botnet detection to block known crypto botnets like CoinMiner.XMRig – Under the Internet facing interface “Scan Outgoing Connections to Botnet Sites”

image1

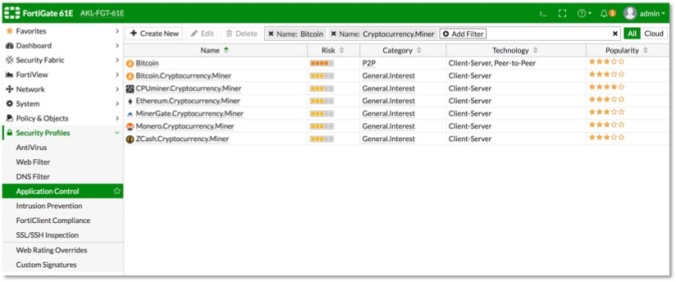
In your Application Control Protocol add the application overrides for the name “Cryptocurrency.Miner” and set the action to block.

image2

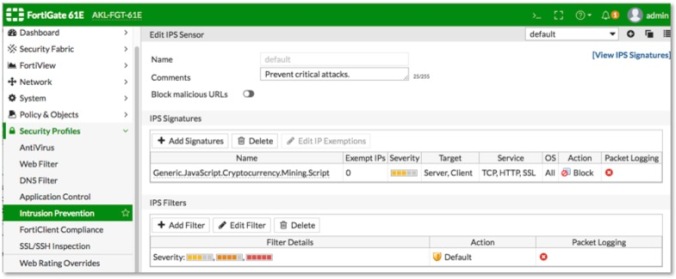
To stop the JavaScript miners running on web browsers from sites that your users visit.   Check your IPS profile is blocking the Generic.JavaScript.Cryptocurrency.Mining.Script.

image3

FortiGuard also has antivirus signatures for Crypto Currency miners that you could enable if the desktop is not already providing this feature and the FortiGate has enough resources available to enable this function.

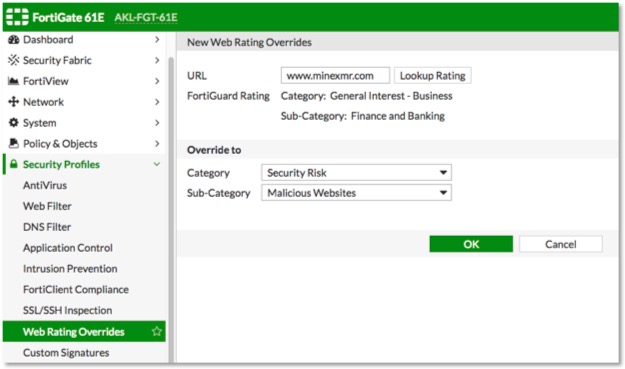
Regarding web filtering –  if you don’t want people visiting the mining home pages you can use the “Web rating overrides” to re-categorize the Crypto Currency Sites from “Finance” to any other category then block that category.

image4

Configuring SSLVPN for both RADIUS and certificate based authentication (check issuer only)

Three links I found useful.
Setting up the required RADIUS attributes in Microsoft NPS
Fortinet cookbook – SSLVPN with solely certificate auth
Fortinet forum post showing how to enable RADIUS + strict check cert upn matches user


PKI user
Allows certificate check (checks cert was issued from trusted CA only – not the CN / UPN.

config user peer
edit "LDAP.certificate.check"
set ca "CA_Cert_1"
next
end


VPN user group
Matches username/password presented against provided LDAP server.

config user group
edit "G.VPN.Admins"
set member "DCSRV.RADIUS"
config match
edit 1
set server-name "DCSRV.RADIUS"
set group-name "CN=SSLVPN_Admins,OU=Groups,OU=Stuff,DC=Contoso,DC=Org"
next
end
next
end


RADIUS server
Checks for user/pass and 2FA

config user radius
edit "DCSRV.RADIUS"
set server "192.168.1.1"
set secret ENC Oe9GhuqdXz5YtIzhfuL2DSnl4AVJDmSWRb0AnhahgZTZBIv1mn+ykT/8E0XcYIjX1EenDwOBdLOoYoIBuXsQhcT0yMwmnLlUOIaIbmHOmBxkqY60flbwazDiHwQLRh/vnHrNRuIN+lrIY3AcxKAjP6zPbZefM3etbxtoHBCvTNnA99TgSUgVjvJgt2k14l+y2bmVww==
set auth-type ms_chap_v2
next
end

Fortinet FSSO architecture


Requirements

For FSSO to operate correctly it requires:

  1. The FSSO Collector Agent to be installed on at least one machine monitoring each active domain controller which users are being logged into
  2. dcagent.dll installed on each active DC
  3. Correct forward and reverse DNS entries for the workstations clients are connecting from
  4. Workstations must have Windows remote Registry services started, and it must be accessible from the machine running the FSSO Collector

The FSSO Collector Agent

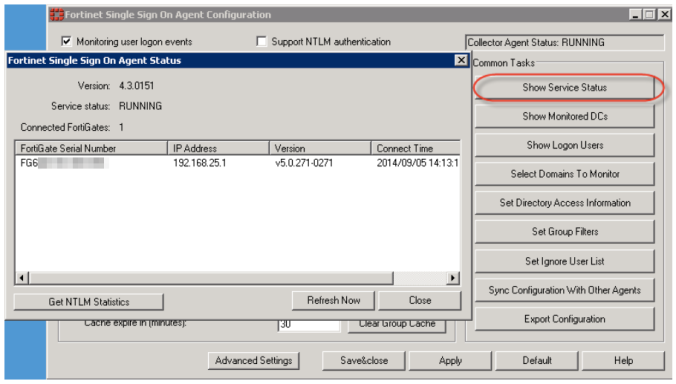
This is the application that collates a view of logged on domain users, and periodically sends this info to the firewall. Only one instance is required but to provide redundancy, the collector can be run on multiple machines. Only one is active at any one time. To locate the active collector, click on the “Show Service Status”. If there is a FortiGate in the list then it is the active FSSO Collector Agent.

 screen_shot_2017-05-04_at_10_43_57_AM


FSSO Agent DLL

This is used to interface to the event log on the domain controllers. It is located in C:\Windows\System32\dcagent.dll on each domain controller which is being monitored by a collector.


FSSO Authentication Process

Each collector constantly polls each active domain controller for new eventlog logon events. When a user logs into their workstation, this will generate such an event. The collector will do a reverse lookup on the IP referenced in the eventlog, to verify the user is still logged into their workstation. The collector will then do periodic checks to ensure the user is still active and on the same IP address since the last poll.

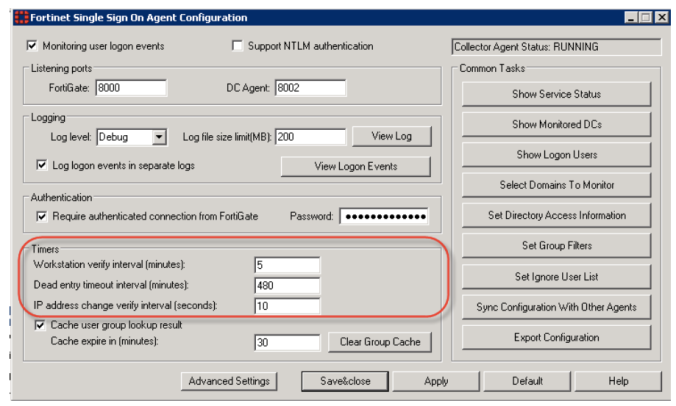
These are defined intervals within the FSSO Agent Configuration:

screen shot 2017-05-04 at 10.39.05 AM

Workstation verify interval

This determines the poll interval for the collector connecting to the workstation (via TCP 139, 445) to verify the user is still logged in. Therefore, the machine which is running the FSSO Collector must have firewall access to the workstations on TCP ports 139 and 445, and the workstation must have remote registry services running.

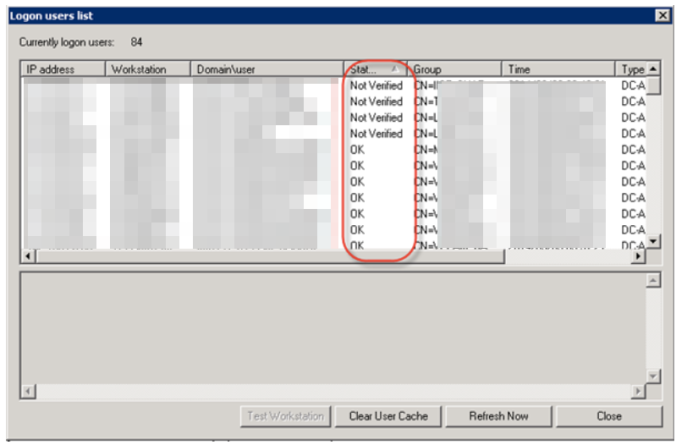
If you look within the “Show logon users” as shown below, you can see the users which are verified with status OK. Where the Status column displays “Not Verified”, this demonstrates that either;-

  • The collector hasn’t yet checked to see the user is still logged on
  • The machine is still connected but does not have the appropriate ports open or accessible
  • The machine is no longer on the network and cannot be communicated with, e.g A laptop has been unplugged from the Ethernet cable and has been taken offsite.

screen_shot_2017-05-04_at_10_39_51_AM


Dead entry timeout interval

At this interval, each of the “Not Verified” user logons (logons found in the eventlog but which the collector is unable to verify by making a remote registry connection to the workstation) present in the collector will be considered dead, and are purged.

IP address change verify interval

This is the period that the FSSO Collector will check to see if the users IP address has changed. This is accomplished by performing a forward lookup on the workstation hostname (the hostname is retrieved from the initial PTR lookup on the IP Address collected from the event log).

Things to note

There are certain circumstances which have been recorded where internet access stops. The two fixes are listed below.

1. The user locks their workstation and unlocks. In most cases this will resolve the issue.
2. If the first does not work. Within command prompt type “ipconfig /registerdns” wait a couple of minute and then try again.

Further investigation is required around a dns register/resolving problem which is resolved by #2.

SSD Total Bytes Written (TBW)

Product: FGT, FortiOS 5.4.1
Level: Beginner
Scope: CLI
Author: Gregory Ciolek

Each SSD has a TBW (Total Bytes Written). Most SSD vendors put that number in the specification.

So let’s check HOMER’s drive:

diagnose hardware smartctl /dev/sdb -a

smartctl 5.43 2012-06-30 r3573 [x86_64-linux-3.2.16] (local build)
Copyright (C) 2002-12 by Bruce Allen, http://smartmontools.sourceforge.net

=== START OF INFORMATION SECTION ===
Device Model:     D2CSTK251M3T-0120.F
Serial Number:    A22IQ061520001344
LU WWN Device Id: 5 e83a97 1000668d7
Firmware Version: 2.50
User Capacity:    120,034,123,776 bytes [120 GB]
Sector Size:      512 bytes logical/physical
Device is:        Not in smartctl database [for details use: -P showall]
ATA Version is:   8
ATA Standard is:  ACS-2 revision 3
Local Time is:    Tue Sep 27 11:30:32 2016 GMTb
SMART support is: Available - device has SMART capability.
SMART support is: Enabled

=== START OF READ SMART DATA SECTION ===

SMART overall-health self-assessment test result: PASSED
General SMART Values:
Offline data collection status:  (0x00)    Offline data collection activity
                    was never started.
                    Auto Offline Data Collection: Disabled.
Self-test execution status:      (   1)    The previous self-test routine completed
                    without error or no self-test has ever 
                    been run.

Total time to complete Offline 
data collection:         (0) seconds.
Offline data collection
capabilities:              (0x79) SMART execute Offline immediate.
                    No Auto Offline data collection support.
                    Suspend Offline collection upon new command.
                    Offline surface scan supported.
                    Self-test supported.
                    Conveyance Self-test supported.
                    Selective Self-test supported.

SMART capabilities:  (0x0003)    Saves SMART data before entering power-saving mode.
                    Supports SMART auto save timer.
Error logging capability:  (0x01)    Error logging supported.
                    General Purpose Logging supported.
Short self-test routine 
recommended polling time:      (   1) minutes.
Extended self-test routine
recommended polling time:      (  36) minutes.
Conveyance self-test routine
recommended polling time:      (   2) minutes.
SCT capabilities:            (0x0025)    SCT Status supported.
                    SCT Data Table supported.
SMART Attributes Data Structure revision number: 10
Vendor Specific SMART Attributes with Thresholds:
ID# ATTRIBUTE_NAME                          FLAG     VALUE WORST THRESH TYPE      UPDATED  WHEN_FAILED RAW_VALUE
  1 Number of Accumulation of Uncorrectable Error   0x0033   120   120   050    Pre-fail  Always       -       0x000000000000
  5 Reassigned block count                          0x0033   100   100   003    Pre-fail  Always       -       0x000000000000
  9 Power_On Hours count                            0x0032   091   091   000    Old_age   Always       -       0x00000000214F
 12 Power_Cycle_Count                               0x0032   100   100   000    Old_age   Always       -       0x000000000068
171 Program fail count                              0x000a   000   000   000    Old_age   Always       -       0x000000000000
172 Erase fail count                                0x0032   000   000   000    Old_age   Always       -       0x000000000000
174 Unexpected power loss count                     0x0030   000   000   000    Old_age   Offline      -       0x00000000006A
177 Wear_Leveling_Count                             0x0000   000   000   000    Old_age   Offline      -       0x000000000001
181 Program_Fail_Cnt_Total                          0x000a   000   000   000    Old_age   Always       -       0x000000000000
182 Erase_Fail_Count_Total                          0x0032   000   000   000    Old_age   Always       -       0x000000000000
187 Reported_Uncorrect count                        0x0012   100   100   000    Old_age   Always       -       0x000000000000
194 Temperature_Celsius                             0x0022   041   059   000    Old_age   Always       -       0x000000000029
195 Hardware_ECC_Recovered                          0x001c   120   120   000    Old_age   Offline      -       0x000000000000
196 Reallocated_Event_Count                         0x0033   100   100   003    Pre-fail  Always       -       0x000000000000
201 Soft_Read_Error_Rate                            0x001c   120   120   000    Old_age   Offline      -       0x000000000000
204 Soft_ECC_Correction                             0x001c   120   120   000    Old_age   Offline      -       0x000000000000
230 Percentage of total write/erase                 0x0013   100   100   000    Pre-fail  Always       -       0x000000000064
231 Temperature_Celsius                             0x0013   100   100   010    Pre-fail  Always       -       0x000000000000
233 Media_Wearout_Indicator                         0x0032   000   000   000    Old_age   Always       -       0x0000000010CE
234 Percentage of total write/erase(BC blocks)      0x0032   000   000   000    Old_age   Always       -       0x0000000006AB
241 Total_LBAs_Written                              0x0032   000   000   000    Old_age   Always       -       0x0000000006AB
242 Total_LBAs_Read                                 0x0032   000   000   000    Old_age   Always       -       0x0000000020C9
SMART Error Log not supported
SMART Self-test Log not supported
SMART Selective self-test log data structure revision number 1
 SPAN  MIN_LBA  MAX_LBA  CURRENT_TEST_STATUS

    1        0        0  Not_testing
    2        0        0  Not_testing
    3        0        0  Not_testing
    4        0        0  Not_testing
    5        0        0  Not_testing

I highlighted the most important stuff for this exercise:

D2CSTK251M3T-0120.F – OCZ Deneva 2 C Series – solid state drive – 128 GB – SATA 6Gb/s – http://www.conetec.su/upload/iblock/ecd/OCZ_Deneva2.pdf and this is 20TBW (4k) or 120TBW (128K)

Sector Size 512 – We are going to use this.

233 Media_Wearout_Indicator – Value – this indicate how helthy is the drive – 0 is the best
241 Total_LBAs_Written  – this is current TBW in a RAW format.

So we need to do some math:

0x0000000006AB (hex) = 1707 (dec)
1707 * 512 (LBA size) / 1073741824 = 0.000813961 TBW

and the verdict is – There’s a long life ahead for HOMER.

Setting up FortiAuthenticator for SSO using SAML and an Identity Provider

There are a few steps in order to get this working properly. You’ll first need a stiff drink, so get one while you still have some hair on your head.

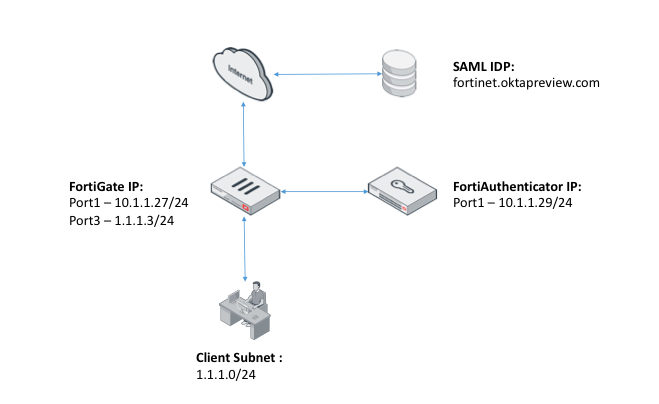
Topology

screen-shot-2016-09-26-at-10-06-07-am

FortiAuthenticator

  1.  Configure the Device FQDN for FortiAuthenticator (i.e fortiad.net) under System > Dashboard > Status > System Information > Device FQDN.
  2. Enable SAML Authentication under Fortinet SSO Methods > SSO > SAML Authentication. Check the Enable SAML Portal checkbox.

    Portal URL, Entity ID and ACS URL will all be generated automatically once the Device FQDN has been configured.

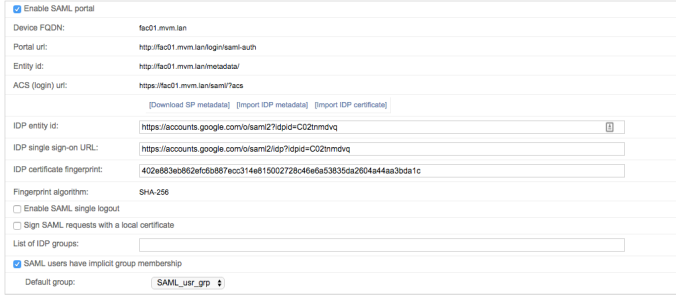
  3. Configure the Identity Provider’s Entity ID, Single Sign-On URL & download the Certificate Fingerprint, all of which would be available on the IdP site once an App has been created.Okta:

    Google Apps:

    Pay special attention to the group attributes – you will open yourself up to a lot of pain if these aren’t correct.

    Once created, it should look like this:

    screen-shot-2016-09-23-at-6-57-03-pm

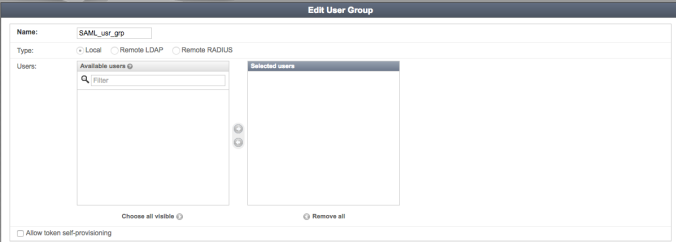
  4. Create a local user group on FAC (User Management > User Groups) which will contain authenticated users. We’ll name this group ‘SAML_usr_grp’.screen-shot-2016-09-23-at-6-56-22-pm
  5. Enable FortiGate as an SSO source under Fortinet SSO Methods -> SSO -> General. Choose a secret, write it down.Screen Shot 2016-09-23 at 7.00.48 PM.png
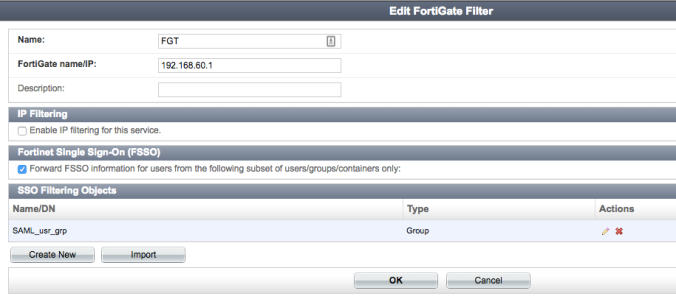
  6. Configure a FortiGate under Fortinet SSO Methods -> SSO -> Fortigate Filtering. Tick ‘Forward FSSO info for users from the following subset of users/groups only’, then hit ‘Create New’. Use a group object type, and type in the same name as the group you created in step 1. This must be exactly the same name, and is case sensitive.

    This step is extremely important, as failure to create a group with exactly the same name will result in the user SSO information not being pushed to the right “holding” group on the FortiGate, which will eventually cause the user not being able to access the Internet even though they have successfully authenticated with the IdP.

    Screen Shot 2016-09-23 at 7.03.55 PM.png
    After you’ve done this, it should look like this.

    Screen Shot 2016-09-23 at 7.04.00 PM.png

FortiGate

  1. Set up a new SSO entry on the FortiGate under User & Device -> Single Sign-On, pointing to FAC.screen-shot-2016-09-23-at-6-58-51-pm
    Configure the Primary Agent IP/Name with the IP of the FortiAuthenticator and configure it with the same password as the one you’ve create under step (8) of the FortiAuthenticator configuration. OK it.Once you click Apply & Refresh, you should be able to view the Users/Groups that have been pushed over by FortiAuthenticator.screen-shot-2016-09-23-at-6-58-51-pm
  2. Create two groups on the FortiGate – a holding group and a firewall group for you to use in your policies to control access.
    1. Holding group – type Fortinet Single Sign-On, we’ll call it “SAML-users”. Leave the Members empty at first, we’ll come back to this later to verify that the right user group has been applied to it – it should contain the group coming through from FortiAuthenticator – in our case ‘SAML_usr_grp’
    2. Firewall group – type firewall, we’ll call this ‘SAML-Group’
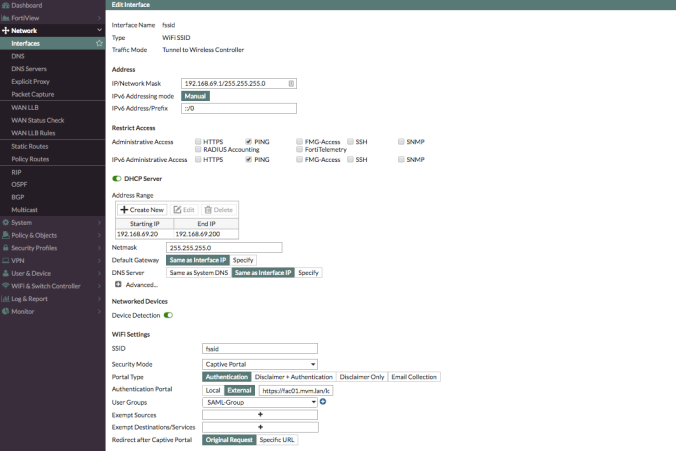
  3.  Under Network > Interfaces, edit the relevant interface (i.e. port3).  Set Security Mode to Captive Portal. Set Authentication Portal to External and configure the external portal’s URL (i.e. http://fac.fortiad.net/login/saml-auth). The External Portal URL can be found under FortiAuthenticator’s Fortinet SSO Methods > SSO > SAML Authentication > Portal URL. Set User Access to Restricted to Groups. Set User Groups to the user group (i.e. SAML-Group) created in step (2) of FortiGate config. OK the changes.

    screen-shot-2016-10-07-at-10-51-49-am

  4. Firewall policies
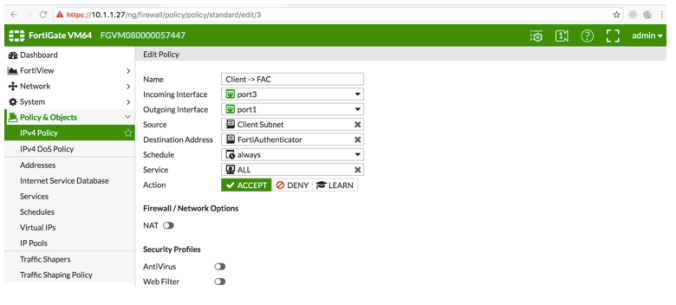
    1. Client to FAC – To redirect request from Client to FAC – Set Captive Portal Exempt for this policy on CLI – Also remember to uncheck NAT so that FortiAuthenticator will register the client machine’s IP instead of the FortiGate’s IP after authenticating against the SAML IdP.

      Screen Shot 2016-10-07 at 10.53.29 AM.png

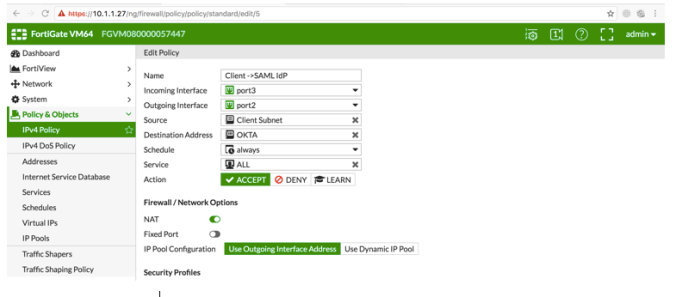
    2. Client to SAML IDP – This firewall policy to only allow authentication traffic to go through to the IDP site but not regular internet traffic – Set Captive Portal Exempt for this policy on CLI

      Screen Shot 2016-10-07 at 10.54.07 AM.png

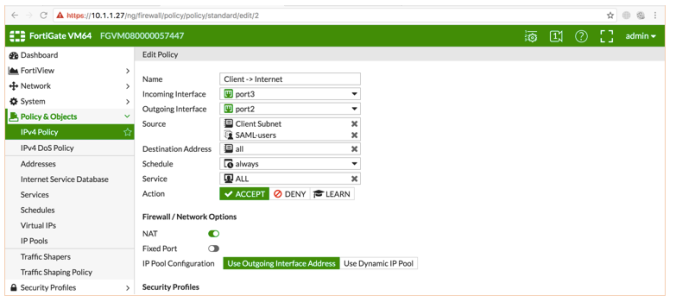
    3. Client to Internet – This Firewall policy is the actual firewall policy that will implement the Identity Based Policy to allow authenticated SSO users or Deny unauthenticated users.

      Screen Shot 2016-10-07 at 10.54.34 AM.png

    4. Done!


Troubleshooting

If you receive this error:

saml app_not_configured_for_user

Check to ensure your FAC entity and SSO URLs are correct in your iDP configuration.