There are a few steps in order to get this working properly. You’ll first need a stiff drink, so get one while you still have some hair on your head.
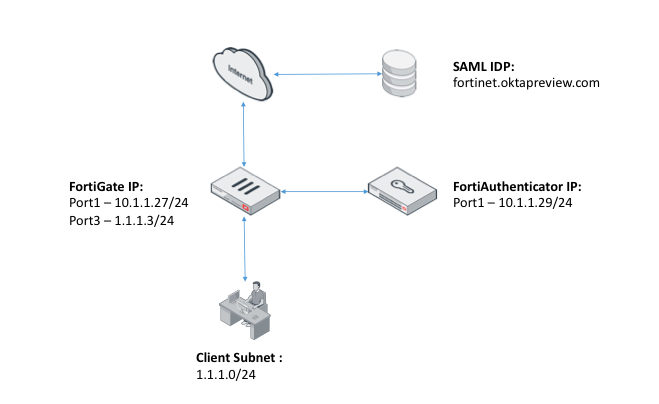
Topology
FortiAuthenticator
- Configure the Device FQDN for FortiAuthenticator (i.e fortiad.net) under System > Dashboard > Status > System Information > Device FQDN.
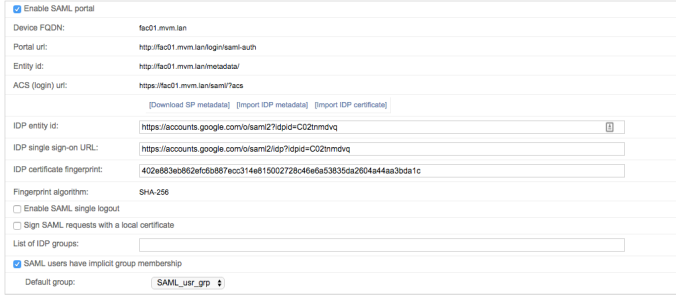
- Enable SAML Authentication under Fortinet SSO Methods > SSO > SAML Authentication. Check the Enable SAML Portal checkbox.
Portal URL, Entity ID and ACS URL will all be generated automatically once the Device FQDN has been configured.
- Configure the Identity Provider’s Entity ID, Single Sign-On URL & download the Certificate Fingerprint, all of which would be available on the IdP site once an App has been created.Okta:


Google Apps:


Pay special attention to the group attributes – you will open yourself up to a lot of pain if these aren’t correct.
Once created, it should look like this:
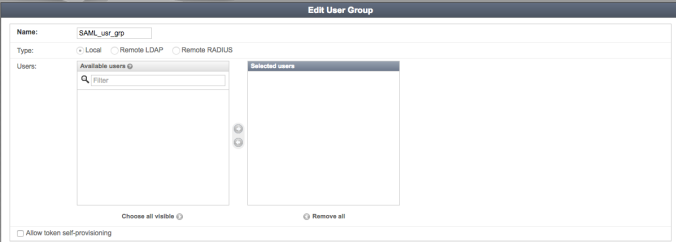
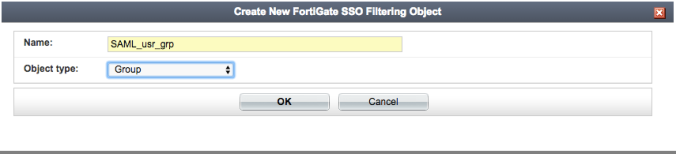
- Create a local user group on FAC (User Management > User Groups) which will contain authenticated users. We’ll name this group ‘SAML_usr_grp’.
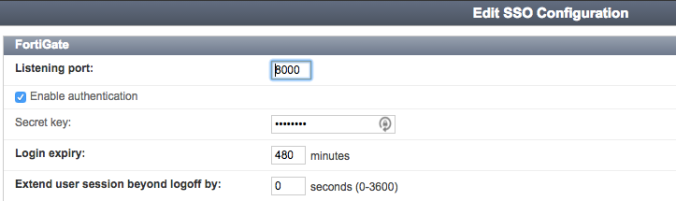
- Enable FortiGate as an SSO source under Fortinet SSO Methods -> SSO -> General. Choose a secret, write it down.
- Configure a FortiGate under Fortinet SSO Methods -> SSO -> Fortigate Filtering. Tick ‘Forward FSSO info for users from the following subset of users/groups only’, then hit ‘Create New’. Use a group object type, and type in the same name as the group you created in step 1. This must be exactly the same name, and is case sensitive.
This step is extremely important, as failure to create a group with exactly the same name will result in the user SSO information not being pushed to the right “holding” group on the FortiGate, which will eventually cause the user not being able to access the Internet even though they have successfully authenticated with the IdP.
After you’ve done this, it should look like this.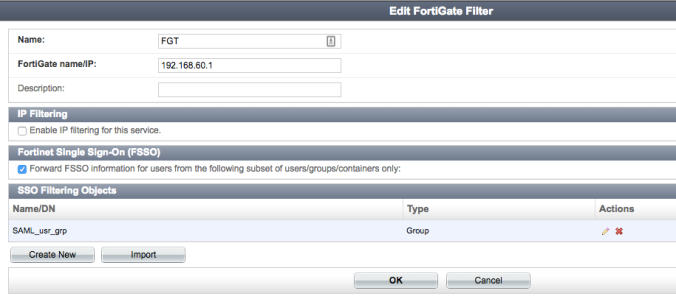
FortiGate
- Set up a new SSO entry on the FortiGate under User & Device -> Single Sign-On, pointing to FAC.
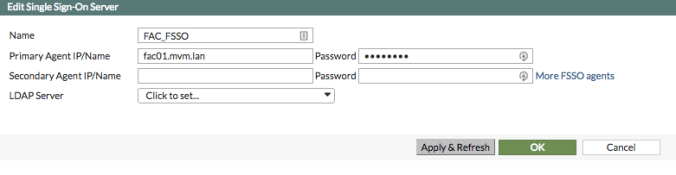
Configure the Primary Agent IP/Name with the IP of the FortiAuthenticator and configure it with the same password as the one you’ve create under step (8) of the FortiAuthenticator configuration. OK it.Once you click Apply & Refresh, you should be able to view the Users/Groups that have been pushed over by FortiAuthenticator.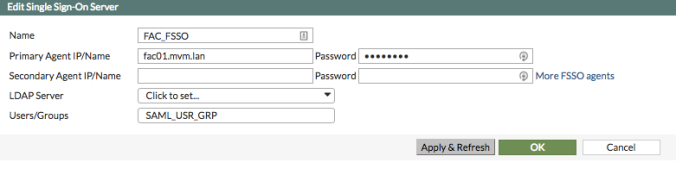
- Create two groups on the FortiGate – a holding group and a firewall group for you to use in your policies to control access.
- Holding group – type Fortinet Single Sign-On, we’ll call it “SAML-users”. Leave the Members empty at first, we’ll come back to this later to verify that the right user group has been applied to it – it should contain the group coming through from FortiAuthenticator – in our case ‘SAML_usr_grp’
- Firewall group – type firewall, we’ll call this ‘SAML-Group’
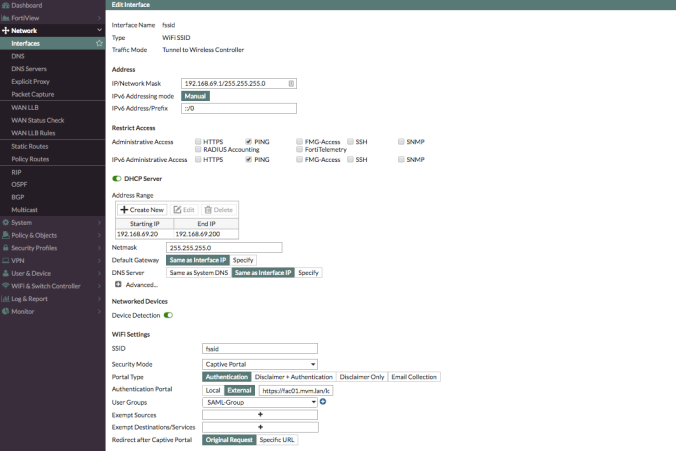
- Under Network > Interfaces, edit the relevant interface (i.e. port3). Set Security Mode to Captive Portal. Set Authentication Portal to External and configure the external portal’s URL (i.e. http://fac.fortiad.net/login/saml-auth). The External Portal URL can be found under FortiAuthenticator’s Fortinet SSO Methods > SSO > SAML Authentication > Portal URL. Set User Access to Restricted to Groups. Set User Groups to the user group (i.e. SAML-Group) created in step (2) of FortiGate config. OK the changes.
- Firewall policies
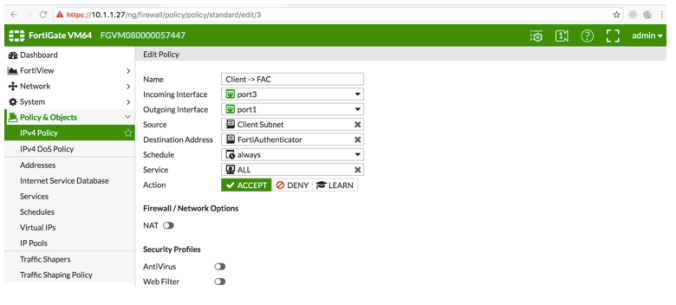
- Client to FAC – To redirect request from Client to FAC – Set Captive Portal Exempt for this policy on CLI – Also remember to uncheck NAT so that FortiAuthenticator will register the client machine’s IP instead of the FortiGate’s IP after authenticating against the SAML IdP.
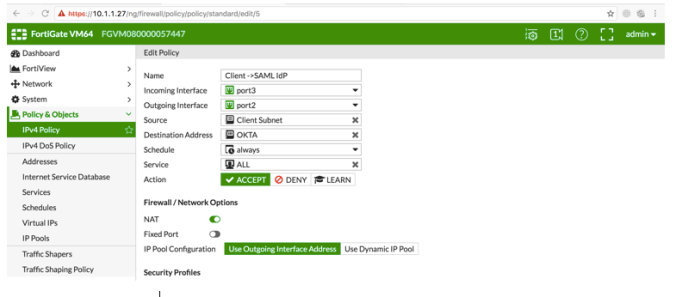
- Client to SAML IDP – This firewall policy to only allow authentication traffic to go through to the IDP site but not regular internet traffic – Set Captive Portal Exempt for this policy on CLI
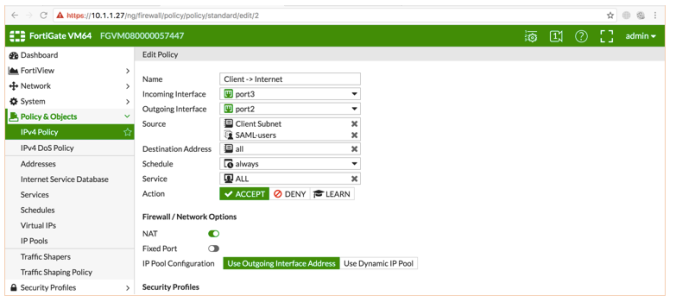
- Client to Internet – This Firewall policy is the actual firewall policy that will implement the Identity Based Policy to allow authenticated SSO users or Deny unauthenticated users.
- Done!
- Client to FAC – To redirect request from Client to FAC – Set Captive Portal Exempt for this policy on CLI – Also remember to uncheck NAT so that FortiAuthenticator will register the client machine’s IP instead of the FortiGate’s IP after authenticating against the SAML IdP.
Troubleshooting
If you receive this error:
saml app_not_configured_for_user
Check to ensure your FAC entity and SSO URLs are correct in your iDP configuration.

Hello,
Your tutorial has been very useful for me, so thanks for that.
Additionally, I would like to ask if it’s possible to obtain information about the user’s “Organizational Unit” in Google Apps and depending of that link that user to a group or other with different permission.
My objective is to use Gapps for authentication on a school where two different OU exist: Teachers and Students. If the authenticated user is a user that belongs to the Students OU, it will have more restricted permissions in the Fortigate than a user that belongs to the Teachers OU.
I am able to do this with Aruba Clearpass using OAuth2 but I don’t know how to do it with Fortiauthenticator
LikeLike